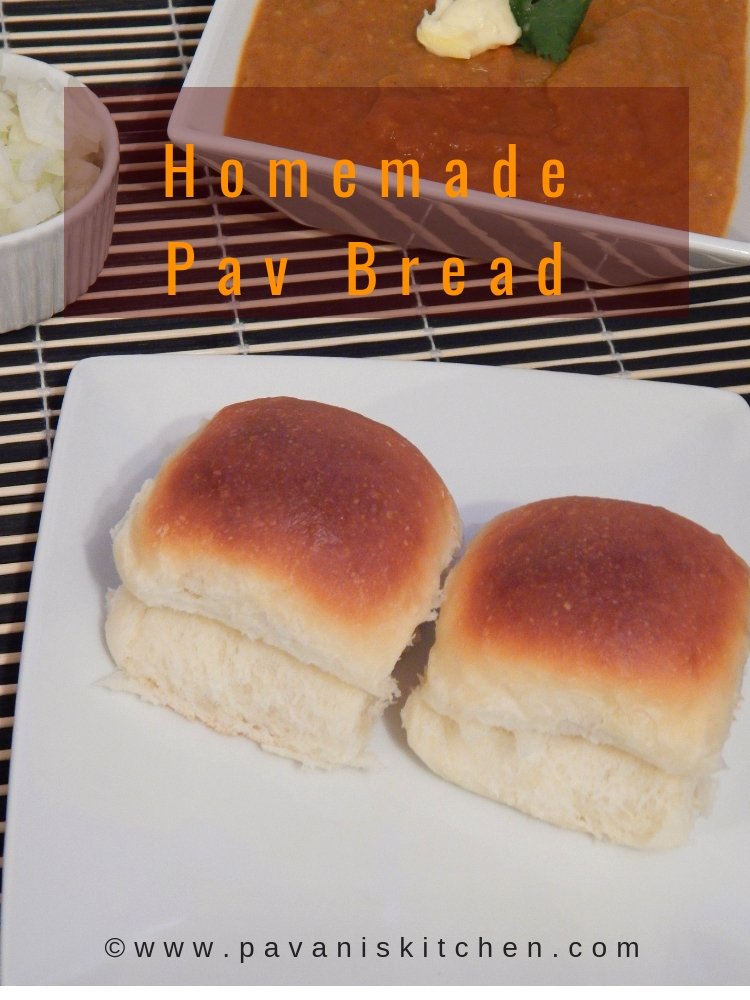
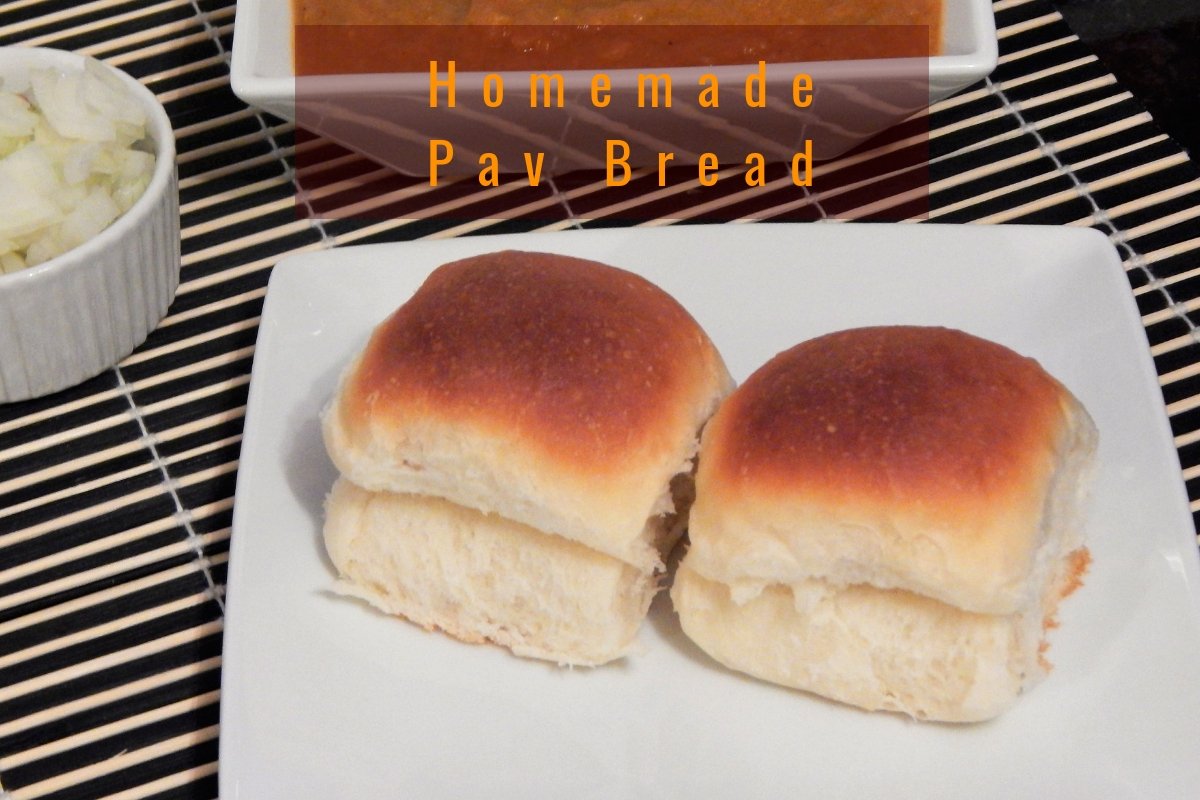
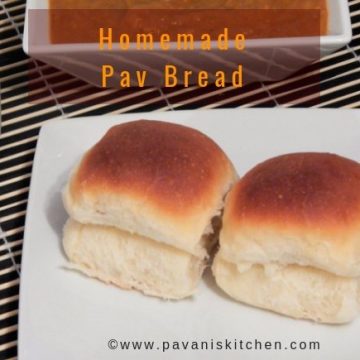
Homemade Pav Bread is very easy to prepare at home. This is my third time making this Pav bread. It is so soft, fluffy and much better than the store brought ones. My kids love this bread very much and they take it to school also for lunch.
This is my 5th baking dish for Bake a thon which is hosted by Srivalli.
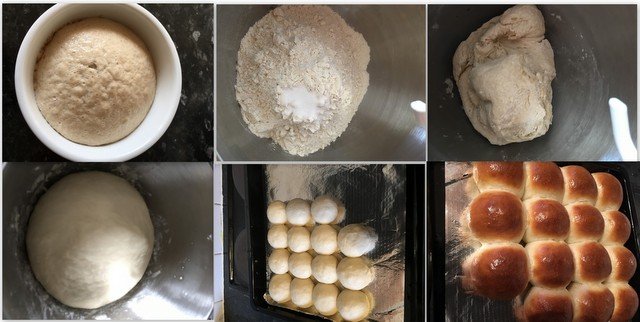
Step by step pictures of Homemade Pav Bread

Ingredients:
- Plain flour/maida-2cups +3tbsp (for dusting)
- Milk-¾ cup + 2tbsp
- Butter-4tbsp
- Sugar-1tbsp
- Salt-1tsp
- Active dry yeast-2tsp
- Oil-3tbsp
Preparation:
Take a bowl, add warm milk, yeast, sugar and stir well. Cover and rest it for at least 5-10minutes or until you see the frothy.
In the bowl of a stand mixer, fitted with dough hook, add flour, salt, oil and butter. Mix on low speed. (You can mix the dough with your hands without using a stand mixer)
Then add the fermented yeast mixture and start mixing on low speed, until all the ingredients combine together. Then increase the speed from medium to high speed for a minute or until it forms into a dough.
Cover and rest the dough until it doubles in its size. (it took 11/2 hours for me)
After the dough rises, punch the dough and knead for another 5 minutes.
Divide the dough equally and roll each ball in palms to get a smooth round ball.
Grease the pan with oil and place the balls. Cover it with a cling film and rest again for the second time to raise. (it takes 40-45 minutes)
Preheat the oven to 200°C
After that brush, the balls gently with melted butter and bake at 200°C for 10-15 minutes.
Remove the tray from the oven and allow it cool. Then transfer the pav on the wire rack to cool. Now again apply the melted butter the second time to get the shiny gloss.
Enjoy tasty and delicious Pav with your favourite sabji or curry.
📖 Recipe
Homemade Pav Bread | How to make Pav buns
Ingredients
- Plain flour/maida-2cups +3tbsp for dusting
- Milk-¾ cup + 2tbsp
- Butter-4tbsp
- Sugar-1tbsp
- Salt-1tsp
- Active dry yeast-2tsp
- Oil-3tbsp
Instructions
- Take a bowl, add warm milk, yeast, sugar and stir well. Cover and rest it for at least 5-10minutes or until you see the frothy.
- In the bowl of a stand mixer, fitted with dough hook, add flour, salt, oil and butter. Mix on low speed. (You can mix the dough with your hands without using a stand mixer)
- Then add the fermented yeast mixture and start mixing on low speed, until all the ingredients combine together. Then increase the speed from medium to high speed for a minute or until it forms into a dough.
- Cover and rest the dough until it doubles in its size. (it took 11/2 hours for me)
- After the dough rises, punch the dough and knead for another 5 minutes.
- Divide the dough equally and roll each ball in palms to get a smooth round ball.
- Grease the pan with oil and place the balls. Cover it with a cling film and rest again for the second time to raise. (it takes 40-45 minutes)
- Preheat the oven to 200°C
- After that brush, the balls gently with melted butter and bake at 200°C for 10-15 minutes.
- Remove the tray from the oven and allow it cool. Then transfer the pav on the wire rack to cool. Now again apply the melted butter the second time to get the shiny gloss.
- Enjoy tasty and delicious Pav with your favourite sabji or curry.

Check out the other bloggers doing this Bake-a-thon
 Loading InLinkz ...

Homemade ladi pav looks amazing Pavani ! I simply love this hot off the oven and slather it with a teeny bit of garlic butter ! Yumm
Dunno if my comment went thru!
Homemade ladi pav is perfectly made Pavani n I once slathering garlic butter on a fresh warm
Pav bun and eating it just as is
Can't tell you how much I have missed pav after moving out from Maharashtra. My vada was incomplete without pav and sliced bread just doesn't taste the same. Thanks for sharing this article I am definitely going to try this recipe out.
A pillow soft Pav is a treat on it’s own and specially if they are straight out of the oven ! These Pav have come out absolutely gorgeous and are tempting me !
Homemade is surely always the best... the pav buns look so soft!
Such a soft and pillowy pav buns, they are just prefect to enjoy with some Bhaji, nothing can beat homemade pav buns na.
I can feel the softness of the bun!! I always love pav buns with Channa.
Those pav look super soft and inviting!..fantastic that you make it at home..
They look pillowy soft and super yumm..
Super soft pav buns,perfectly made and looks like the store bought one.
Nothing can beat the taste and softness of home made pav buns. Yours are so perfect.
soft and fluffy pav buns, nothing can beat the taste of homemade buns! yours look perfect!!!
Those pav buns are beautifully baked. Such lovely crust and they have the perfect crumb. Your are tempting me to make some bhaji for that pav 🙂
They look super soft and perfectly brown. Fresh homemade bread is always the best option!
I made pav rolls once some years back when I made pav bhaji. and homemade rolls are always best.
You Pavs look super soft and pillowy!! So perfect to go with any side dish or just as bun maska with chai!!
The pav looks so soft and fluffy. Perfectly baked
Those are lovely with perfect brown crust and would go well with bhaji or soup.
So pillowy soft pav, perfect texture and perfectly baked. They look like store bought.
Pav buns look so soft and pillowy. Perfectly baked. I can have them just as it is without any accompaniment
I tried this recepie BT failed my dough became so sticky and also after proofing it for an 2 hour oil or butter separate from my dough
Divya, I make this recipe regularly with the same measurements and never failed. Maybe you have add more water or milk and you need to knead it very well.
Hey Pavani,
Super soft and yummy buns. This is my fool proof recipe for making pav/ bun. I have a query, can this recipe be used for making loaf bread as well. If so what is the baking time. Thanks
Thank you Farmina. Yes you can make loaf bread with this recipe and bake @180degree Celsius for 18-20 minutes.
Thank you. I have tried and came out really good. Texture was perfect.
Thank you Farmina, for trying the recipe and for your feedback.Hope you enjoyed it.